Click on the Single-Level Mode  icon in the Level Manager toolbar in the upper right of the user interface. Doing this will switch the program into single-level mode.
After you have defined the model criteria, modeled the geometry, set up load cases and combinations, applied load, and meshed the level they wish to analyze, the model is ready to be analyzed in single-level mode. You can Perform an Isolated Single-Level Analysis taking into account only the applied loads and self-weight of that level, or you can Perform a Single-Level Analysis with Inclusion of Global Reactions from a multi-level analysis.
In a single level run without including global reactions or load takedown the program would analyze the isolated level with only the applied loads included on that level in the analysis. If you want to account for the actions above the level you are analyzing, you can run a single-level analysis including the lateral and gravity reactions/loads from the multi-level analysis or tributary load takedown. You can choose to include these reactions/loads from the Analysis Options window.
The usefulness of being able to analyze a single level from a multistory model may present itself often within the context of a project. In some cases, the objective may only be to design a specific level or range of levels within a larger model. In this instance, Single-level mode would be useful and practical from a design standpoint. In the event that a multilevel model is mostly complete, but there is a slight architectural change on one level, you have the ability to update the analysis and design for a single level while still incorporating lateral loads and load takedown from the global solution. The analysis option to include global analysis results is not limited to transfer levels. It can be utilized for any level when in Single-level mode.
To perform an isolated single-level analysis:
To perform an analysis of a single level which only accounts for the actions at the active level follow the below steps.
Click on the Single-Level Mode icon in the Level Manager toolbar in the upper right of the user interface. Doing this will switch the program into single-level mode.
Navigate to the Reference plane you wish to analyze.
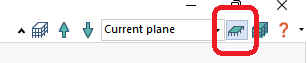
Go to Analysis> Analysis panel and click on the Execute Analysis icon.
icon.
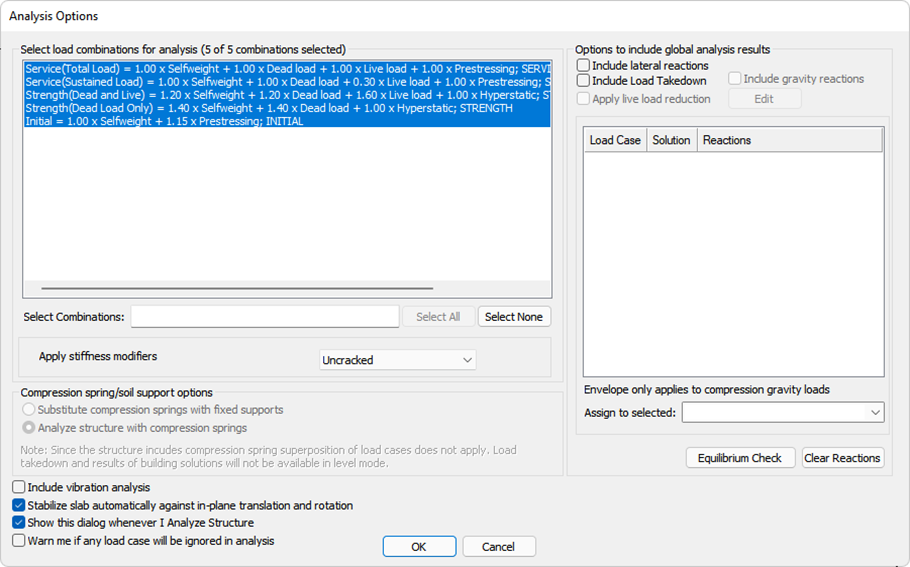
The Analysis Options window will open as shown below. Refer to the Analysis Options topic for more information on the setting in this dialog.
Click image to enlarge
Select the options and load combinations you which to include in the analysis run and click the OK button. The program will start the analysis process.
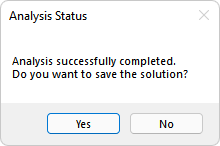
Once the Analysis process completes click YES when prompted to save the solution.
Once the solution is saved, you can View Graphical Analysis Results on plan.
To perform a single-level analysis with inclusion of global reactions:
To perform an analysis of a single level which accounts for the actions transferring from the supports above down to the level you are analyzing follow the below steps.
Click on the Single-Level Mode icon in the Level Manager toolbar in the upper right of the user interface. Doing this will switch the program into single-level mode.
Navigate to the Reference plane you wish to analyze.
Go to Analysis> Analysis panel and click on the Execute Analysis icon.
The Analysis Options window will open as shown below. Refer to the Analysis Options topic for more information on the setting in this dialog.
Select the options and load combinations you wish to include in the analysis run.
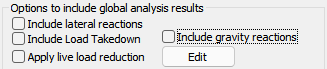
In the Options to include global analysis results panel on the right side of the Analysis Options window select to Include Lateral Reactions, and/or Load Takedown or Gravity reactions, and/or Live Load Reduction. If the option is inactive refer to the Analysis Options topic to learn how to make the option active so that it may be chosen.
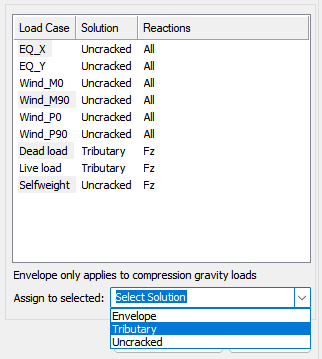
In the pane directly below the Options to Include global analysis results, for each load case available, assign the solution you want to include in the analysis. You also have the option to envelope the results from the available FEM and imported reactions and Tributary Load Takedown solutions.
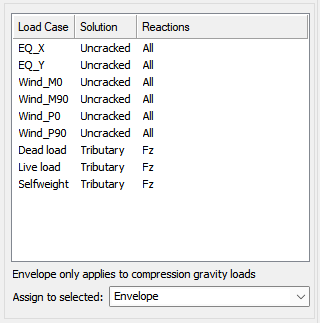
Click the Solution cell in line with the Load Case you want to change the solution result for to bring up a drop-down list of the available solutions.
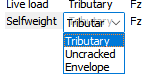
Do the same for each load case you want to set the solution result to use for the reaction. Alternatively, you can select one or more load cases and use the Assign to selected option to change the solution for all selected load cases.
Once the solution sets are setup correctly. Click the Equilibrium Check button of the Analysis Options window to ensure equilibrium is OK otherwise the solution for lateral loads will not be correct.

Close the equilibrium check report.
Click the OK button on the Analysis Options window, the program will start the analysis process.
Once the Analysis process completes click YES when prompted to save the solution.
Once the solution is saved, you can View Graphical Analysis Results on plan.